Wi-Fi Troubleshooting: Windows 10 Wi-Fi is Not Working
Can’t get to your email, synchronize your files, or receive video calls? Having no internet is one of the most frustrating problems of today. Fortunately, there are plenty of methods for Wi-Fi troubleshooting that you can try. If your Windows 10 Wi-Fi is not working, first make sure that your modem or Wi-Fi device has nothing wrong with them physically – check them for damage.
Next, check the indicator lights array on your modem/device. In case certain indicator lights are off or a different one is blinking from the usual, your laptop won’t connect to Wi-Fi because your connection is down.
Wi-Fi Troubleshooting in Windows 10
If your Windows 10 Wi-Fi is not working, you can first try these quick fixes.
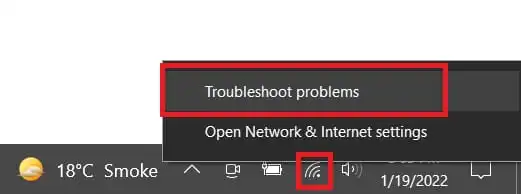
- Click the right mouse button on the Wi-Fi icon in the Taskbar, click “Troubleshoot problems”. The wizard automatically checks your connection for problems and fixes them.
- The next obvious thing to check is to see whether your Wi-Fi modem is ON and if it is properly plugged in. Next, ensure your laptop’s Wi-Fi switch is on.
- Turn off the modem/Internet device and wait for 20 seconds and turn it on again. Alternatively, restart the modem. If this doesn’t work then reset the modem. You can also find how to reset or restart the modem on its manual. This will solve most of the Wi-Fi problems.
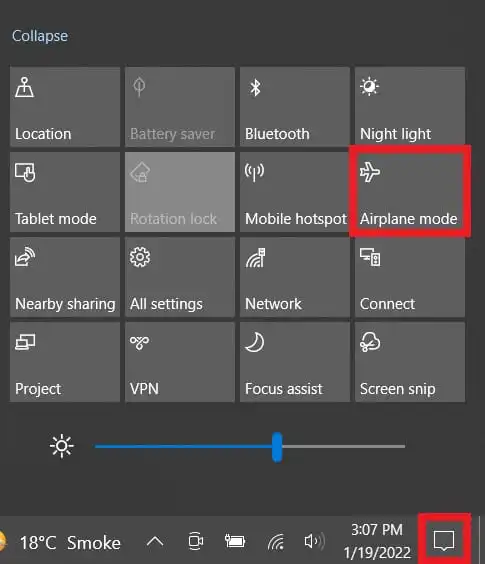
- See if you are in airplane mode. Go to the notification icon in the notification tray, click it, and have a look at the settings buttons in the lower half of the slide-out menu. If airplane mode is active, that button appears highlighted. Click it to turn it off.
- Check whether you are connected to the correct network. Click the Wi-Fi icon in the notification tray at the bottom-right corner of the taskbar. Go through the list of available connections, and select the right one. Alternatively, if you are already connected to the right Wi-Fi network, right-click on it and select “Forget”, then type in the password to connect again.
Related: How to Schedule a Shutdown in Windows 10
Update Your Computer and Network Drivers
If your laptop won’t connect to Wi-Fi, the problem may be with your Windows or drivers updates.
- Navigate to Start > Settings > Update & Security and select Windows Update, click on “Check for updates”.
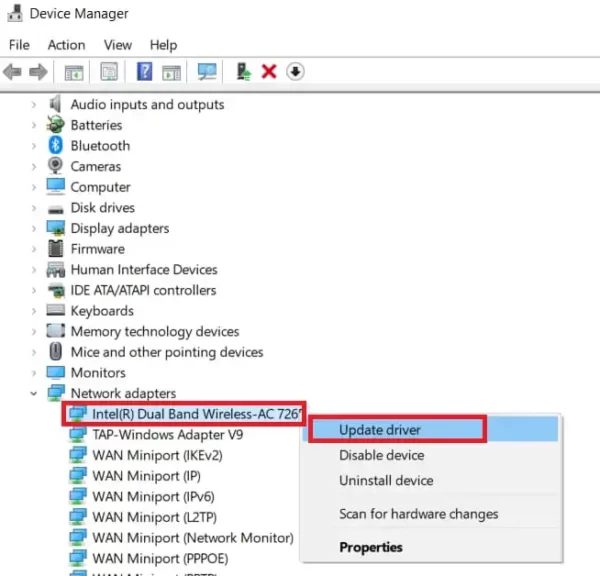
- Next, update the network adaptor drivers through the Device Manager. Tap the Windows key + X to launch the taskbar menu, and select the Device Manager > Network Adapters, right-click on the name of the adapter and choose “Update”.
- If a driver update causes your Wi-Fi to not work, right-click and select Properties > Driver tab > “Rollback Driver”.
- Some network or security-linked apps can restrict network settings, so check your Windows firewall or antivirus program settings.
If your Wi-Fi is connected but still doesn’t work, try opening a different website in your browser. Websites can go down occasionally, while your ISP can block some.
Other Wi-Fi Troubleshooting Methods
1) Ping Test
If your Windows 10 Wi-Fi is not working, you can easily do a ping test to see your Wi-Fi connection problems in Windows 10. You can look for the correct fixes for Wi-Fi connection problems based on the results.
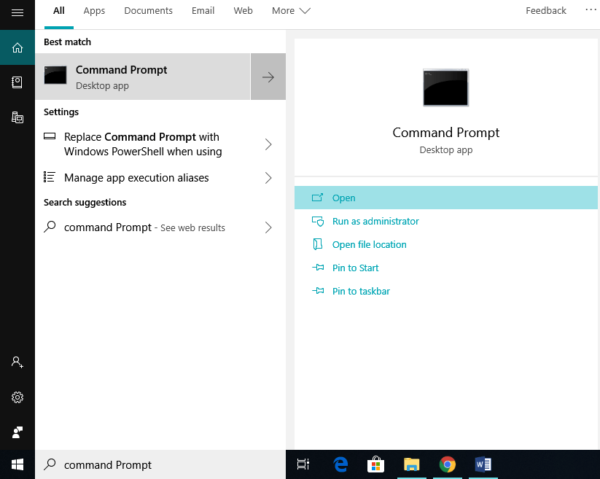
- Navigate to Start > Search, write Command Prompt in the search bar, and open it.
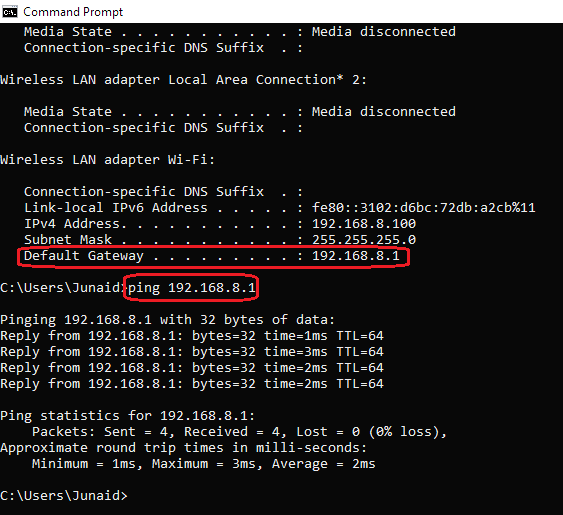
- When the command prompt window launches, enter the “ipconfig” command and press “Enter”. Find your Wi-Fi connection and its IP address among the results, the latter of which appears with the default gateway. Note it down. The format for the Default gateway is xxx.xxx.x.x.
- Next, type “ping xxx.xxx.x.x” (e.g. ping 110.110.0.0, without the quotation marks) in the prompt window and hit Enter. Replace xxx.xxx.x.x with your default gateway address.
- If you get results like below, your Wi-Fi connection to the router is all set. Check with your ISP whether there is an internet outage.
- If the ping test shows no reply received from the Wi-Fi router, see if it is possible to directly connect the Ethernet cable to your PC. Can you connect to the internet with the Ethernet cable? If so, your Wi-Fi device is the culprit.
Related: How to Configure The Dell Trusted Platform Module
2) Resetting the TCP/IP Stack
This is another common Wi-Fi troubleshooting trick. The Transmission Control Protocol (TCP) or Internet Protocol (IP) is a collection of protocols for communication in networks. By using the following below commands, you can reset the TCP/IP stack, IP address, and the resolver cache for the DNS client.
- Open the Command Prompt.
- Type the commands below as they appear and in the same order. Tap Enter after every command.
- netsh winsock reset
- netsh int ip reset
- ipconfig /release
- ipconfig /renew
- ipconfig /flushdns
Once finished, see if your computer connects to the internet.
3) Check your Wi-Fi settings
If your laptop won’t connect to Wi-Fi, make sure that the network adapter is compatible with your Wi-Fi network.
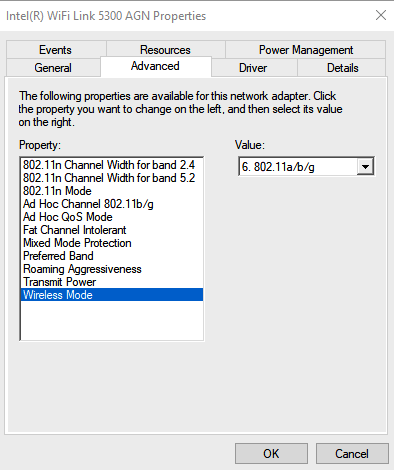
In case of no match, you cannot connect and the Wi-Fi network may disappear from the available networks list. Check their compatibility using Wireless Mode setting.
- Press Windows logo key +X. Select Device Manager > Network Adapters > right-click on the adapter name, and choose “Properties”.
- In the Properties dialog, open the Advanced tab and scroll through the list. Click on “Wireless Mode”. Ensure the correct value is selected for your network’s mode.
4) Boot in Safe Mode
Booting in Safe Mode will help you to figure out why your Windows 10 Wi-Fi is not working. Since this mode runs only the necessary drivers and other basic processes, you can figure out if a third-party app or other setting is causing the issue.
5) Resetting your network
If you tried all the above methods and your laptop still won’t connect to Wi-Fi, reset your network as a last resort. When you reset your network, it removes all the previous network adapters along with their settings and other data.
During resetting, your PC uninstall and then reinstall the network adapters with default settings.
Before you start, make sure your Windows 10 version is 1607 or any after this one. Check the version by going to Start > Settings > select System > click “About.
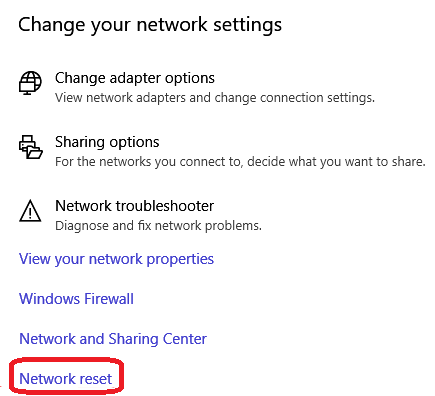
- Go to Start > Settings > Network & Internet, select Status from the left, scroll down to the end, and click “Network reset” under “Change your network settings”.
- Next, under Network reset, click on the “Reset now” button and click Yes in the dialog prompt.
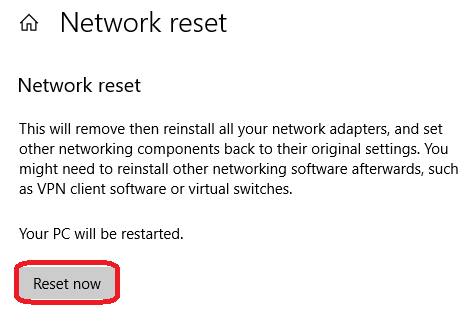
- The PC goes through with the reset and restarts. After that, check whether you can successfully connect to the Wi-Fi connection now.
- The network reset option will probably solve almost all Wi-Fi-related problems.
Note: Does this article provide the info you’re looking for? Is there any information you think of missing or incorrect? You can give your opinion in the comments section below.
If you like this tutorial, share this post and spread the knowledge by clicking on the social media options below because “Sharing is caring”