How to Run Dell ePSA Enhanced Pre-Boot System Assessment
Dell ePSA (Enhanced Pre-boot System Assessment) is a built-in diagnostic tool for Dell systems to check for hardware failures. The tool provides detailed information and error codes that can help resolve any issues with your system. If you are experiencing problems with your Dell computer, it is recommended to run the ePSA test before contacting Dell Technical Support for assistance.
Preparation Before Running Enhanced Pre-boot System Assessment Diagnostics
- Connect a keyboard, mouse, and monitor to the computer if you are running ePSA on a desktop PC. For laptops, leave this step.
- Shut down the computer.
- Unplug the power cable(s).
- Press the Power button for about 30 seconds to flush the power out.
- Plug the power cable(s) back in.
Launching the Dell Enhanced Pre-Boot System Assessment (ePSA) Test
The BIOS launches the ePSA internally as it’s embedded within it. There are two ways to launch the ePSA test on your Dell computer:
Method 1:
- Turn on your Dell system and wait for the Dell logo screen to appear.
- Press the F12 key multiple times to access the One Time Boot Menu.
- Select the Diagnostics option.
- The hardware diagnostics will then begin to run on all the devices that are detected.
- If you want the diagnostic test to run on a specific device, you can press Esc and then choose the device, and click Run Tests.
- You will see an error code, service tag, and a validation code if there is any issue.
- If no error is found, you can choose the Advance Test option at the bottom left corner.
- Here you have the option to check the Thorough mode and Select all boxes at the top right and click on Run Test. This will perform more extensive testing.
- Once the test completes, look for the error code, service tag, and validation code if any, and contact Dell Technical Support. You can also contact Dell support through your mobile device. Just scan the QR code that appears below and follow the steps to speak with a Dell support agent.
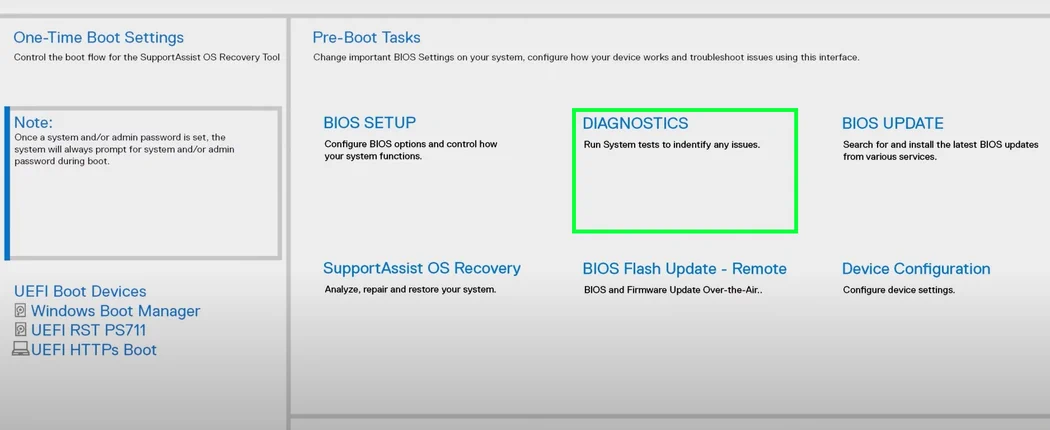
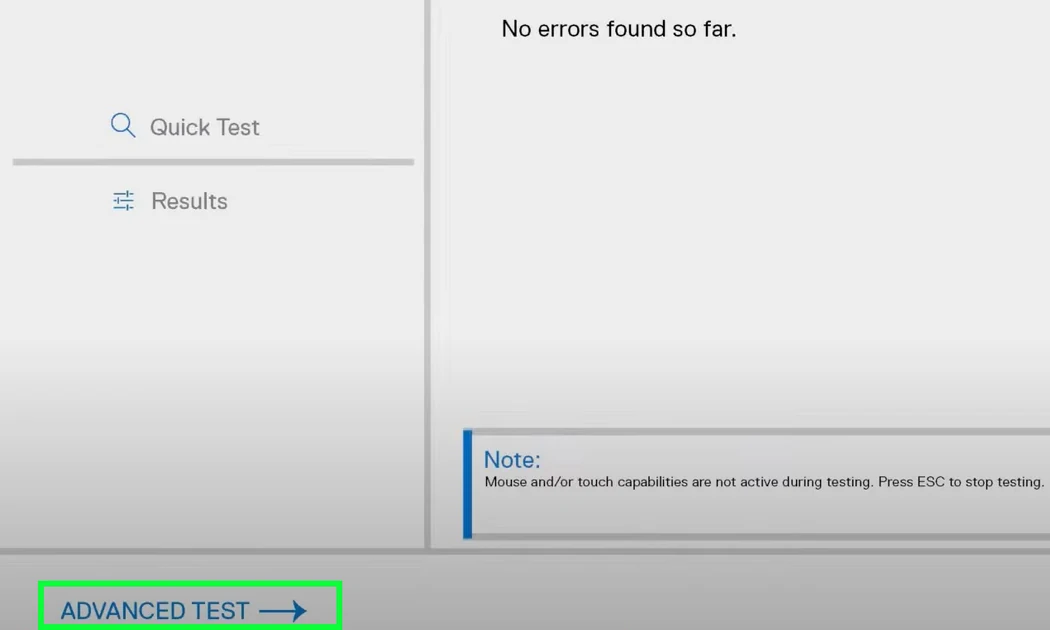
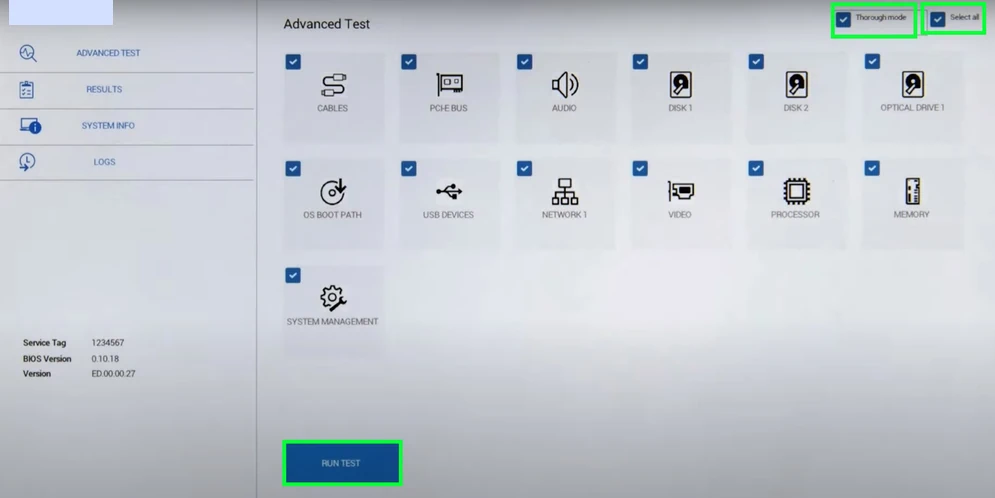
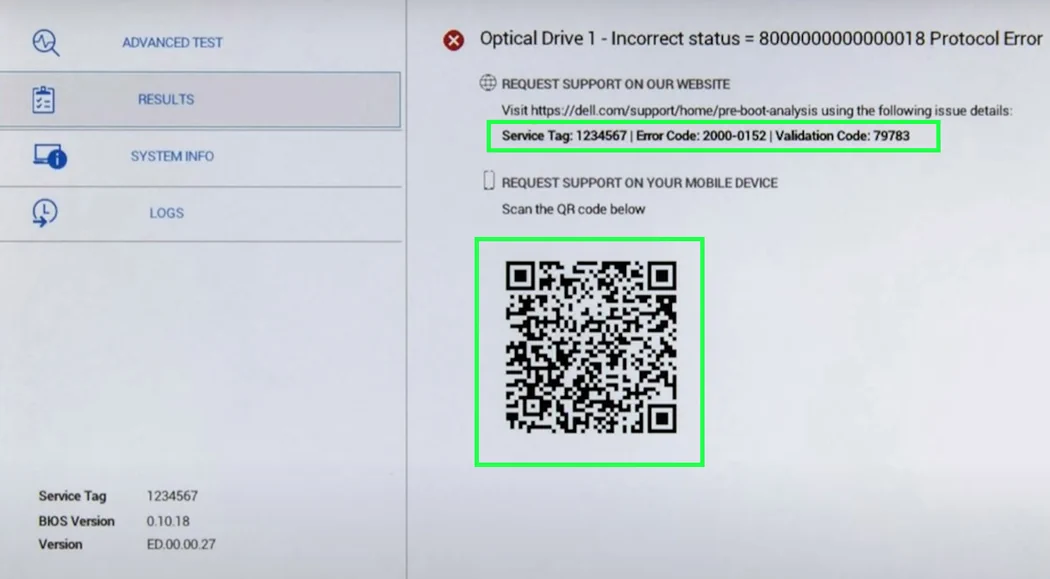
Note: Consult your Dell computer’s user manual for information specific to your device, as the interface may be different than shown in the screenshots above.
Method 2:
- Turn off the laptop/computer.
- Press and hold the Fn key, then press power, and release both.
- On the boot menu, choose Diagnostics.
- From here, follow the steps mentioned in method 1.
- Note down the error codes that appear and contact Dell.
How to Run Forced ePSA?
A hardware failure may prevent your PC from booting. If you’re experiencing a boot failure, you can run a forced ePSA test by pressing the F2 key on the Dell logo screen. The forced ePSA test will execute a number of hardware tests, including inspections of the power supply, battery, and internal components (such as cables to hard drives and video cards).
What to Expect During the ePSA Test?
During the ePSA test, you may notice the internal fans of your computer spinning up. Additionally, the ePSA will ask you if you want to proceed with the 30-minute long memory tests. If you don’t think you have a memory problem, you can decide to skip these tests.
Recording Error Codes
An error message will appear if the ePSA test runs into a hardware issue. When reporting the problem to Dell Technical Support, it is crucial to write down the error code and the validation code that is displayed. You can also look up the error code to get the detail about the error.
Contacting Dell Technical Support
You should contact Dell Technical Support with the error code and validation code if the ePSA test detects any hardware p problem. They will be able to help you to resolve the issue if the system is in the warranty period. You must contact Dell directly if the system is no longer under warranty.
Overall, the Dell ePSA (Enhanced Pre-Boot System Assessment) is a powerful tool that can help you troubleshoot the hardware of your system from outside the operating system (OS). Whether you’re experiencing a boot failure, a hardware failure, or simply want to ensure your system is running optimally, the ePSA test can provide valuable information and guidance. If you have any questions or need further assistance, don’t hesitate to contact Dell Technical Support Personnel.
Note: Does this article provide the info you’re looking for? Is there any information you think of missing or incorrect? You can give your opinion in the comments section below.
If you like this tutorial, share this post and spread the knowledge by clicking on the social media options below because Sharing is caring.




You have covered all the aspects of the topic. Great piece of article!!
First of all, nice post. I have encountered some memory issues on my Dell laptop. I was searching for EPSA test to diagnose the issue and I found your article. You have written a comprehensive post on this topic.
A comprehensive article on this topic… Great!!!
Very informative article.
Another informative article… keep up the good work.
It’s exactly what I was searching for. Very useful post. Thanks a lot.
A complete tutorial about the Dell epsa test. I was searching the tutorial from the last few days but couldn’t find such a comprehensive guide. Thanks for sharing. Keep up the good work.